
jLabelを使った画像表示とアニメーション
画像表示はGraphicsオブジェクトを使って行う場合も多いですが、JLabelを使う方法も簡単です。
jLabel表示でのアニメーション表示サンプルを紹介します。
このサンプルでは、画像表示のためのJLabelコンポーネント(jLabel1)を1個用意し、jButton1をクリックすると
画像ファイル6つ(image0.jpg~inage5.jpg)を一定の時間間隔(100ミリ秒)で
切り替えながら表示することでアニメーション表示を行います。この動作を一定の時間間隔(3秒)で繰り返します。
動作の繰り返しと画像の切り替えにそれぞれtimerコンポーネントを使います。
動作画面例
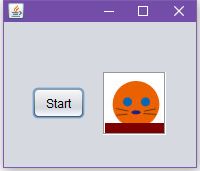
JLabelを使ったアニメーションサンプル
プログラムはいつものようにNetBeansのGUIデザイナを使用していますので、ソースコードは手動入力する部分のみ示します。
import javax.swing.ImageIcon;
import java.awt.event.*;
/**
 *
 * @author K
 */
public class ImageDispLabel extends javax.swing.JFrame implements ActionListener{
	ImageIcon[] IconArray= new ImageIcon[6]; //使用する画像ファイルの個数を指定
	//例えばjavax.swing.JLabel[][] LabelArray= new javax.swing.JLabel[2][4]; //JLabelを複数使用する場合、行数,列数を指定。
	javax.swing.Timer[] timerArray = new javax.swing.Timer[2];//使用するタイマーの数を指定。
	//使用タイマー数は、このサンプルではモグラ出現のタイマーとアニメーションのタイマーの二つ。
	String[] strId={"timer1","timer2"};//timer識別用文字列
	int timerNumber=2;//何個のタイマーを使うのか
    int[] timeIntArray= {3000,100};//Timer interval 動作間隔と画像を切り替える間隔
	int imagePosStatus=0, direction=1;

	/**	/**
	 * Creates new form ImageDispLabel
	 */
	public ImageDispLabel() {
		initComponents();

		//画像ファイルはこのプロジェクトのclassesフォルダに入れておく。
		IconArray[0]=new ImageIcon(getClass().getResource("image0.jpg"));
		IconArray[1]=new ImageIcon(getClass().getResource("image1.jpg"));
		IconArray[2]=new ImageIcon(getClass().getResource("image2.jpg"));
		IconArray[3]=new ImageIcon(getClass().getResource("image3.jpg"));
		IconArray[4]=new ImageIcon(getClass().getResource("image4.jpg"));
		IconArray[5]=new ImageIcon(getClass().getResource("image5.jpg"));

        for (int i=0;i < timerNumber;i++){
            timerArray[i]= new javax.swing.Timer(timeIntArray[i] , this);
            timerArray[i].setActionCommand(strId[i]);//actionPerformed内での識別用文字列
        }
		jLabel1.setIcon(IconArray[0]);
	}

		public void actionPerformed(ActionEvent e){
		//timer1、timer2がトリガーされるとここが呼び出される。
        String cmdStr = e.getActionCommand();//どのtimerのトリガーかを識別
        if(cmdStr.equals(strId[0])){//timer1
			timerArray[0].stop();//アニメーション中は、timer1は止めておく。
			timerArray[1].start();
		} else if(cmdStr.equals(strId[1])){//timer2
            AnimateImage();//次のイメージをjLabel1に表示する
		}
    }

	public void AnimateImage(){//アニメーション動作のメイン
		jLabel1.setIcon(IconArray[imagePosStatus]);
		imagePosStatus+=direction;
		if(imagePosStatus == 5){ //上まで終了
			direction=-1; //動く方向を下へ
		}else if(imagePosStatus == -1){//1往復完了
			imagePosStatus =0;
			direction=1;
			timerArray[1].stop();//Animation動作終了
			timerArray[0].start();//timer1を再開する。
		}
	}

//以下のメソッドは、NetBeansのデザイナ画面ではボタンをダブルクリックにより自動生成されるのでその中に記述
    private void jButton1ActionPerformed(java.awt.event.ActionEvent evt) {
		timerArray[0].stop();
		timerArray[1].stop();
		imagePosStatus =0;
		direction=1;
		timerArray[1].start();
    }

	//以下内容省略